
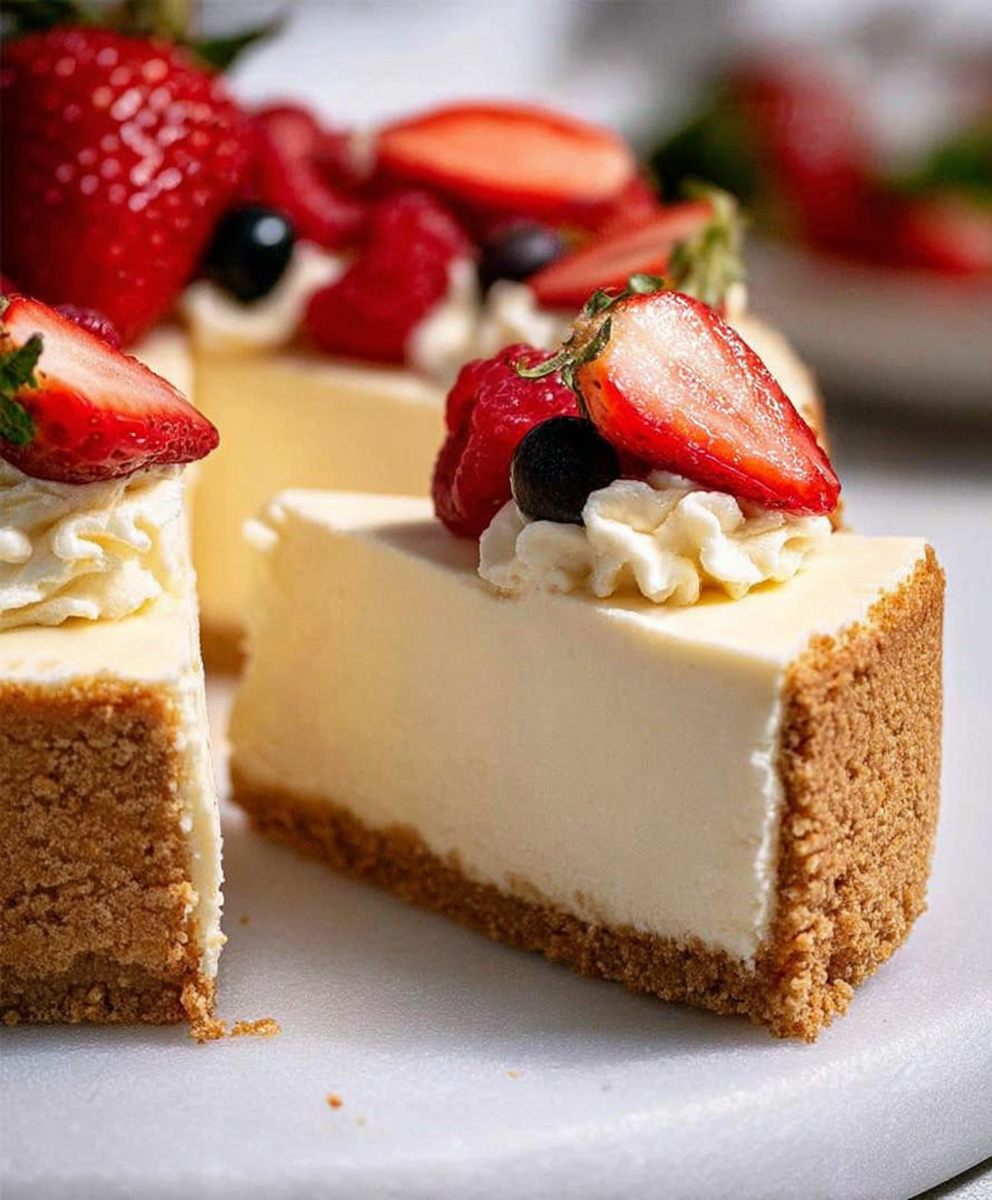
This is a No Bake Cheesecake that tastes incredibly close to a classic baked cheesecake, without the fuss of the oven! It boasts a light-yet-creamy filling and a buttery, crumbly crust that everyone goes crazy for.
I’m fiercely loyal to my classic baked cheesecake, but the no-bake version is perfect for hot summer days, when the oven is out of the question, or when I’m short on time and want something elegant without the stress.
That said, a no-bake cheesecake should never compromise on quality for convenience. The filling must be rich yet light, silky smooth, and set firmly enough to slice neatly. And here’s the secret weapon: gelatin powder. Skip it, and your cheesecake either won’t set or will require far more cream cheese, making it dense and heavy. Trust me, I’ve tried it both ways!
Baked vs. No-Bake Cheesecake
This no-bake cheesecake is intentionally very similar to my classic baked cheesecake. The main difference? No eggs in the filling, making it slightly lighter. Baked cheesecakes rely on eggs for structure, while this version uses gelatin to set the filling.
Other than that, texture and sweetness are almost identical – most people wouldn’t be able to tell the difference. My goal was to achieve the same luxurious creaminess and smoothness as the baked version.
What Makes This Cheesecake Special
Cheesecakes come in many forms, from Japanese Cotton Cheesecake, light and souffle-like, to New York Cheesecake, dense, rich, and very sweet. My no-bake cheesecake sits comfortably in between:
-
Filling: Mousse-like, velvety smooth, not overly delicate
-
Cream Cheese: 500g (16 oz)
-
Sugar: 150–200g (5.3–7 oz) depending on your taste
-
Texture: Rich yet light, perfect for slicing
This balance ensures it’s creamy, elegant, and indulgent, but not overwhelmingly sweet.
Ingredients for No Bake Cheesecake
Planning ahead is essential. This cheesecake needs at least 6 hours to set, preferably overnight. Here’s what you’ll need:
Cream Cheese – Always use blocks, not tubs. Soften at room temperature for at least 1 hour to make it smooth and fluffy.
Gelatin Powder – Affordable, widely available, and consistent worldwide. Bloom in minimal water before adding to the filling.
Whipping Cream – Must be fridge-cold to whip properly. Whip to stiff peaks to keep the filling light and airy.
Sugar – Use caster sugar for a smooth, lump-free filling.
Vanilla Extract – Real extract only. Avoid imitation essence.
Lemon Juice – Optional, just a touch for subtle tang.
Salt – Enhances flavors, balances sweetness.
Biscuits & Butter – For a buttery, crumbly crust. I also recommend a biscuit wall for extra stability.

Making the Cheesecake
1. Prepare the Pan & Inverted Base
Flip the base of a 20cm/8″ springform pan upside down. Lightly grease and line with parchment, leaving excess hanging over the sides for easy removal. Clip in place.
This step ensures the cheesecake slides off the base effortlessly without cracks or damage.
2. Cheesecake Crust
I love a crumbly, buttery biscuit crust with optional walls. Here’s how to do it:
-
Break biscuits roughly and blitz in a food processor.
-
Add melted butter, sugar, cinnamon, and salt. Blitz until it resembles wet sand.
-
Press crumbs into the pan base and up the walls using a flat tool.
-
Smooth and neaten edges for a clean finish.
Tip: Wet sand should stick together when pinched. Add a little extra butter if necessary.
3. Bloom the Gelatin
-
Sprinkle gelatin over 2 tablespoons of water and let it sit for 5 minutes to bloom.
-
Microwave 15 seconds to melt, mix until lump-free, then let cool slightly.
-
Important: Don’t pour hot gelatin directly into the cream; it can melt and deflate it.
4. Make the Filling
-
Whip cream to stiff peaks.
-
Beat cream cheese with sugar until smooth.
-
Add vanilla, lemon juice, salt, and cooled gelatin. Mix gently.
-
Fold in whipped cream in 2 batches to preserve airiness.
-
Pour into the prepared crust, smoothing the top carefully.
Set: Refrigerate for at least 6 hours, preferably 12 hours.
5. Remove & Decorate
-
Unclip sides and gently slide cheesecake off the base using the parchment overhang.
-
Optional decoration: whipped cream swirls, berries, passionfruit, chocolate or caramel sauce, nuts, or chocolate shavings.
Tips:
-
Handle gently, but the cheesecake is sturdier than it looks.
-
For neat edges, run a knife along the rim or use a flat tool along corners.
Decorating Ideas
-
Whipped cream with halved strawberries along the edge
-
Full coverage whipped cream with berries and icing sugar
-
Fruit compote, passionfruit, or sauces like chocolate or salted caramel
-
Sprinkle nuts or chocolate shavings for texture
Notes & Tips
-
Crust may feel loose initially, but it sets firmly once the filling is added and chilled.
-
Adjust sweetness if you prefer it “American-level sweet.”
-
Cheesecake keeps well in the fridge and tastes even better slightly chilled.
Enjoy! This no-bake cheesecake is elegant, creamy, and decadent but never too rich. Perfect for hot summer days, last-minute desserts, or impressing guests.
Print
No Bake Cheesecake
- Total Time: 6 hours 20 minutes
- Yield: 8–10 servings 1x
- Diet: Vegetarian
Description
A creamy, airy no bake cheesecake with a buttery biscuit crust and a hint of lemon — perfect chilled dessert for any occasion.
Ingredients
- 200 g digestive biscuits, crushed
- 100 g unsalted butter, melted
- 400 g cream cheese, softened
- 200 ml whipping cream, cold
- 100 g caster sugar
- 1 tsp vanilla extract
- 1 tbsp lemon juice
- 1 tsp gelatin powder, bloomed in 2 tbsp water
- Pinch of salt
Instructions
- Mix crushed biscuits with melted butter and press into the base of a 20cm springform pan. Chill for 10 minutes.
- In a bowl, whip cold cream to stiff peaks and set aside.
- Beat cream cheese, sugar, vanilla, lemon juice, and salt until smooth.
- Heat bloomed gelatin gently until dissolved, then fold into the cream cheese mixture.
- Gently fold whipped cream into the cream cheese mixture until uniform.
- Pour filling over the chilled crust and smooth the top.
- Refrigerate for at least 6 hours or overnight until set.
- Decorate with fresh fruit, chocolate, or nuts before serving.
Notes
- Use blocks of cream cheese, not tub cream cheese, for best texture.
- Ensure whipping cream is very cold for best volume.
- Allow cheesecake to set fully for clean slices.
- Optional: make a fruit topping or drizzle caramel on top.
- Prep Time: 20 minutes
- Cook Time: 0 minutes
- Category: Dessert
- Method: No-Bake / Chilling
- Cuisine: American
Nutrition
- Serving Size: 1 slice
- Calories: 320 kcal
- Sugar: 25 g
- Sodium: 90 mg
- Fat: 20 g
- Saturated Fat: 12 g
- Unsaturated Fat: 6 g
- Trans Fat: 0 g
- Carbohydrates: 28 g
- Fiber: 1 g
- Protein: 5 g
- Cholesterol: 60 mg
Keywords: No Bake Cheesecake, Easy Cheesecake, Chilled Cheesecake, Creamy Cheesecake Dessert

Leave a Comment